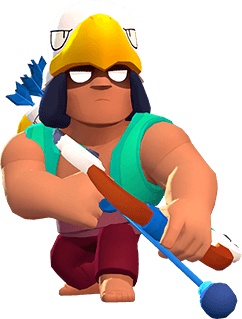
Best Bo Build
Tripwire
Bo triggers all of his mines after 1.5 seconds. During the delay the mines are completely undetectable to opponents.
Snare A Bear
Instead of a knockback, Bo's traps now stun the enemy for 2 seconds!
Reload Speed
15% faster Reload.
Damage
Deal 15% extra Damage when your Brawler is below 50% Health.
Curated from 88 user-created builds, this is the most optimal build for Bo. For the Gadget, Tripwire is used 51% of the time making it slightly better than Super Totem. For the Star Power, Snare A Bear is picked 73% of the time making it a lot better than Circling Eagle.
Bo has 6 Super Rare Gears and one Epic Gear. Out of these, Reload Speed is picked the most at 40%. Reload Speed is great when you have a slow reload or small attack radius for more chances to hit your target. The second best is Damage which is used 30% of the time. Damage is a fantastic Gear to help you win head-to-head battles when you're close to being knocked out.
If you'd like to see other builds for Bo, you can view trending and top-rated community-made guides below.
Hot Builds
 Shelly
 Colt
Colt Bull
Bull Brock
Brock Rico
Rico Spike
Spike Barley
 Jessie
 Nita
Nita Dynamike
 El Primo
 Mortis
 Crow
Crow Poco
Poco Piper
Piper Pam
Pam Tara
Tara Darryl
 Penny
Penny Frank
Frank Gene
Gene Tick
Tick Leon
Leon Rosa
Rosa Carl
Carl Bibi
Bibi 8-Bit
8-Bit Sandy
Sandy Bea
Bea Emz
Emz Mr. P
Mr. P Max
Max Jacky
Jacky Gale
Gale Nani
Nani Sprout
 Surge
Surge Colette
 Amber
Amber Lou
Lou Byron
Byron Edgar
Edgar Ruffs
Ruffs Stu
Stu Belle
Belle Squeak
 Grom
Grom Buzz
Buzz Griff
Griff Ash
Ash Meg
Meg Lola
Lola Fang
Fang Eve
Eve Janet
Janet Bonnie
 Otis
Otis Sam
Sam Gus
Gus Buster
 Chester
 Gray
Gray Mandy
Mandy R-T
R-T Willow
 Maisie
 Hank
Hank Cordelius
 Doug
Doug Pearl
Pearl Chuck
Chuck Charlie
 Mico
Mico Kit
Kit Larry & Lawrie
 Melodie
 Angelo
 Draco
Draco Lily
Lily Berry
Berry Clancy
 Moe
Moe Kenji
Kenji Juju
Juju Shade
Shade Meeple
 Ollie
Ollie Finx
Finx
Bo is a good controller and a good balanced Brawler. His attack is not quite align but he does a lot of damage. The Super is already good for trapping enemies and killing them.
Semi-Comprehensive Guide
Maximizes Bo's trapping potential, creating dangerous zones and ambushes. Emphasizes strategic trap placement to control key areas and punish aggressive opponents. Ideal for defensive play and choke point control.
Good for playing lanes, Gadget can block fatal injury, Shield to make Bo have higher fault tolerance
who to get a free max tier bow guide in brawl stars
Best Way to have Bo set up, as you're going to only play him in bush maps anyway.
Get the pun above
Use everything but the second gear are optional
Star power depends on the map. If there are more bushes, use the other one.
Melhor Build do Bo
Bo, usually a lower tier brawler, is still easy to play
Set your Super Totem up to increase allies’ Super Charging
in general this is the best bo build
Epic brawler
So good